|
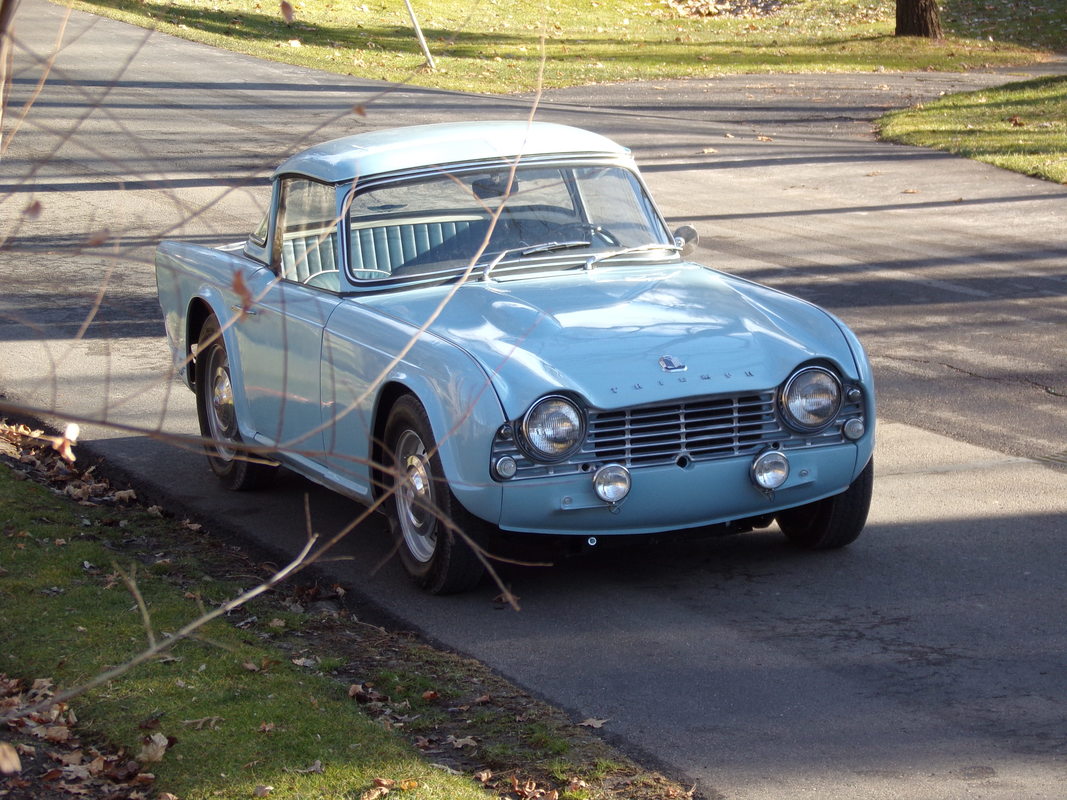
I took the car for a 120 mile run to evaluate the work. Everything checked out except the following: a rattle on the glove box door, passenger side window not adjusted right, a slight leak on the heater pipe, a distinct pull to the left on a straight road, a loose driver's seat mount. But the drive was fun and very comfortable with the fresh air and heater on. It was about 25 F in the morning, 40 F by afternoon. The car is fast, responsive, corners well, and smooth. I took the car over to my favorite spot for photos. Still a few things to do as always, but such a very fun and drive able sports car. Not sure why, but swapping the left and right front wheels solved the pull to the left. A little tightening solved the leak. Oil pressure at hot idle is at 55 psi, 70 psi at speed. Little things like installing sun visors, battery clamp, outside mirror are a pleasure. Installing the door panels (door cards) is a tedious job. The upholstery went well. The heavy English leather on the seats is soft and beautiful. I had to replace the new Hardtop front seal with the original. The new seal from TRF is shaped well but too hard a rubber. The original is soft and squishy. When you put the bolts in the front you wouldn't want to torque them hard to bring the top down. The captive nuts are held to the aluminum top with two rivets each. Seems to be an issue with some parts from suppliers just not being right. My guess is some of these parts may work on a later car with a steel top and maybe the backlight was different. Getting the side carpets screwed in place is tedious. Just when you think you're about done there are some time consuming chores left. I had a rattle on the bonnet that I tracked down and I was missing some felt packing over the left headlight brow. Now things are smooth and quiet. Soon the roads will dry enough to take her out for a test drive. Here are some photos and a video. Soory, I know videos are boring without some conversation but I didn't feel chatty today. It's been way too cold to do much on the car. Today it was 54 F. I have found the best way to install windshields. I have used the rope technique in the past but this way is much better. You call an auto glass guy, he comes out, you visit a little and an hour later the job is done. A lot of shops wanted me to bring the car. Without windows and a license plate it would have needed to be towed. I have used the rope technique in the past, but I don't have all the tools necessary. The suction cups he uses enable bumping the window down and into the gasket better or to the side. The 1/4" braided nylon rope was inserted in the gasket all the way around and back on itself. We used a spray lubricant liberally on the rubber gasket. Then held the windscreen and gasket tight against the windshield frame and starting at the top pulled the lip over the sill and vinyl trim. Two suction cups on the windshield allowed us to bump the window up allowing for more room as we pulled the cord around. The gaskets I got from TRF. The front windscreen gasket was perfect. We warmed it a bit first and it went right in. The backlight gasket I will return. It is probably an inch and a half too long. There is no way that much extra was going to somehow bunch up and go in. Luckily the original was in very good shape, soft and perfect. The tight corners were a bit tricky pulling over the headliner and the bolt covers. The chrome finisher was a bitch to install. We used a lot of lube and a soft mallet to pound it in. The tight corners on the backlight again was where we really had to fight the finisher in. Finally, now that this job is done, just seat upholstery, door panels, sun visors, color sanding, odds and ends. I was a bit dismayed last week when taking the car for a short drive the speedo didn't work. I really didn't want to have an issue at the transmission worm gear. It's a new cable and the speedo worked before. I pulled the cable off the speedo and confirmed it was firmly in the trans by trying to twist. I took the speedo guts out and lubed all the moving parts with some sewing machine oil. I gave the back of the speedo a spin with a screwdriver inserted and the needle started moving but wouldn't return to zero. A bit more oil, a few more spins and things started working. Now it works! On another task - I tried installing the surrey soft top. Like it was just going to be easy! Nope - tucking the front canvas under the new capping was a struggle. The capping was too close and tight in spots and had to be carefully pried up. Then trying to get the snaps and the rear pegs in place it was clear this is a job for a very warm day. The canvas is probably 1-2" short of making the distance. The side glass is such a perfect parallel fit to the windscreen, I don't want to mess with the angle and the Hardtop fits nicely. Even with the bows off the canvas barely makes the span. I sure hope it will fit when it warms up! You think the TR3 top is a tight fit? I was going to have a friend come over and help get the bonnet installed and then remembered I've done it myself and it's actaully easier. Lay a soft blanket across the engine and drape the fenders. Lay a towel or blanket across the grille. Find a large cardboard box and set it on the engine. Now place the bonnet on so that the hinges are a close lineup. You can reach up and get the bolts in loosely. Now remove the box and slowly lower the bonnet and get it lined up with the rear edge, and the front corners lined up with the tips of the fenders. Tighten one bolt each side leaving the others loose. Remove the blankets and slowly lower the bonnet with out the catch installed. Adjust rear corner buffers up or down and fine tune the gaps. Mine has about 1/4" gaps all around. Now a little about my saga. When I first did this I had a 1/2" gap along one fender and less than an 1/8" along the right side fender. There is no side adjustment on the hinges. I didn't take pictures before but the bonnet was definitely 1/2" gap on one side and about 1/8" the other, parallel at back. I took off the right side hinge to explore enlarging the holes to get some sideways adjustment. I put the hinge in the vice and noticed it wasn't straight. It's a fairly stout piece of formed sheetmetal. I figured, what the heck, so I straightened it, oiled the pivot, stuck it back in (I had penciled some lines). Shabam! perfectly centered! Okay, not quite perfect the first try actually. I adjusted the right side an 1/8" rearward to clean up the gap at the rear, but went a bit too far. I latched the bonnet ...and Ooops! it was stuck!!!!! Actually did this twice. Caution: Do not latch a TR4 bonnet unless the pin is perfectly aligned on the catch. It wasn't that the release wouldn't move, but the the edge of the pin catches on the bracket. It is very important when making any adjustments to also align the pin to the catch. This not only will save you heartache but it also affects the alignment of the bonnet. You don't want the latch forcing the bonnet sideways at all. How did I open the bonnet? The release pull handle will stay open by itself in this condition. Bump with your palm over the latch and it may pop open. I resorted to using my door clip tool to pull up on the sheet metal and bang on the hood. Pop! What a stupid design flaw. A hood that can easily get stuck..... Alright, they aren't fenders, they are wings. Before doing the bodywork all body panels should be in place and adjusted and tightened up. There is a lot of flex to the sheet metal so it would be impossible to get the body work correct if the piece was on a bench. However, it's impossible to paint the body panels correctly if they are on the car, because there is a lot of inside, under, in between areas that need paint. The door jams for instance would look terrible if they weren't exposed first for paint. The rear wings bolt up first. They need to be aligned at the front and back with the body tub. The only fine adjustment is the angle parallel with the door and B post. You can pull the sheet metal one way or the other a little to get this gap to door just right and then tighten the bolt at the bottom. Now install the doors. Basically you have in/out, up/down. The door should latch easily and align well with the B post and rear wing. The rubber seal under the front wing in the wheel well is a pain. They originally were clipped in place. I put a small self tapping sheet metal screw through the rubber into the sheet metal to hold it. It helps to warm the rubber with a heat gun and pull the rubber flanges back so they lay flat to the inner wing. Now install the front wings. I get the wing bead laid on the body tub and tape the metal tabs so it stays put while the wing is brought up. Hook the rear tab under the bolt and washer near the windscreen and door. All bolts can go in loosely. Shove the wing back until you close the gap at the door to about 1/4" of an inch. Panel gaps weren't computer controlled back in the day so that's about as close as they are on a Triumph. The wing bead should be even at the front and pressed down tght as you tighten the Ajax screws. The front most tab is cut short and held with a small chromed sheet metal screw. Press the lower part of the wing in tight to the rocker panel so that the lines flow smoothly, recheck the panel gap to door that it is parallel and even and tighten the bolts. There isn't much adjustment on the boot lid. Get the bolts from hinge to lid on and then present carefully to the body. Wont hurt to have some layers of tape down around the holes so you don't scuff the new paint. It's all very fussy and tedious work aligning the panels and it will go much better if you have prepped the body work on the body tub, cleaned all threads with a tap and some grease, have clean fasteners, and have a helper. Luckily most of the body panels can be adjusted again and again if needed. The rear wings not so much so you want to get those on right to start. Another tip is to put some soft tape around end wrenches so you dont chip paint if you slip. Go slow and easy as you adjust door latches so you don't slip and gouge paint. Door latches can be difficult. Here's what I do. Get the latch on the B post and slowly close the door and look at how the pin engages the nylon guide. Typically the pin engages 1/8" low and rides up slightly on the ramped nylon. There are two clicks as it latches. If the door latches but is not all the way in loosen the latch just slightly and wiggle it in that amount. If the door pin strikes the nylon and is hard to close raise the latch. You can also rotate the latch so that the pin glides in smoothly. I installed some fog lights. The mounts for them are like the ones used for the Sebring cars. They are 2" x2" aluminum L channel bolted to the front valence. This car had a switch mounted on the radio plate next to a period cigarette lighter. I ran a wire from the main lighting switch that is hot when the headlights are on. This short wire goes to the fog light switch. I ran a 18 gauge wire (White/Blue) over the steering column and through the harness grommet. It runs up to the engine compartments rain channel and tucks under all the way to the front. When the main lights are switched off so are the fog lights. I installed an inline fuse so if something shorts out on the fog lights I don't lose headlights. Headlights are not fused on a TR4. The first TR4 was built July 7 1961. Mine was built Aug 8, 1962. In that time they were building about 52 cars per day not counting weekends and holidays. My CT # is 15365, Engine # 15442E, the trans # is 15378 and body # is 15220. These cars were pretty much built by hand...someone had to bolt each and every thing. I've had the advantage of not having to build the drive train but its taken me 300 hours so far. If you divide that by 8 hours it would require 38 workers for a day to build my car. They were probably much faster than me and didn't have to clean parts and find the right fastener. 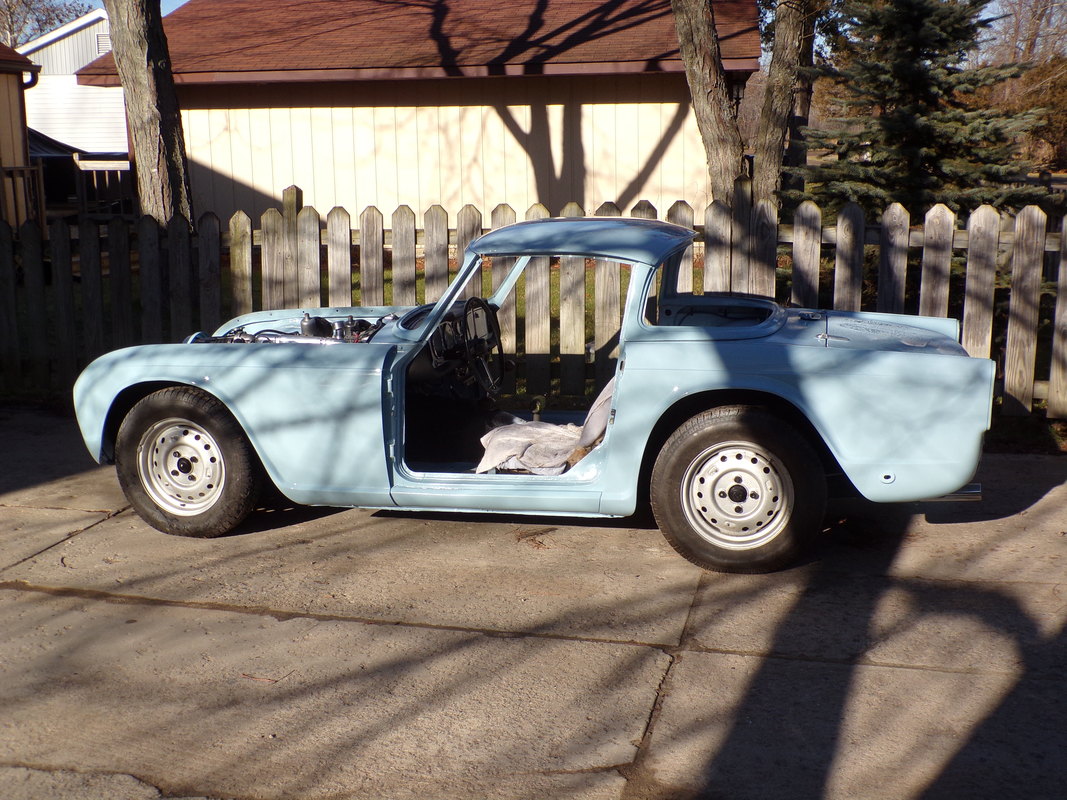 Once the TR4s were mechanically assembled they went to the coach building shop. I have a lot of respect for these craftsmen because fitting out the bodies with upholstery, fabrics, seals and glass is the real work and resulting charm. As the car comes together it strikes me that these cars are part couture and jewelry. Shiny paint against the soft fabrics, rich leather and bright work is a feast for the eyes and senses. Installing the fabric and vinyl to the windscreen and the backlight are pretty straight forward. On the backlight frame just take care to only apply contact cement where the material adheres at the edges. On the windscreen you need to get more aggressive and coat both sides of the area to get the black faux leather to stick down to the cockpit side of the windscreen. Installing the headliner in the hardtop took me 6 hours. I can't imagine the workers in England would have been allowed more than 30-60 minutes for this job. My first challenge was fabricating the listing rails which were missing for this car. The front and middle are 40.5", the rear is 41.5" tip to tip. The headliner material is a textured vinyl that stretches well and looks great against the Powder Blue paint and black seals. You have to use a strong contact adhesive around the perimeter. Lay the headliner in and get all the rails in and turned down. The front rail is captured by two sprung hooks. Pull the edges out and mark on the back with a marker where the glue line will be. Lay the fabric back on itself. Put paper between the vinyl and itself because the contact cement vapors bleed through. Go around the perimeter on the hardtop and the fabric with contact cement and let it flash off til dry. Pull the headliner back in line with the front hooks and stick to the rear edge and then work the middle and to the sides moving forward and finally lightly stretch the front and stick down. You don't want to pull the front rail away from the hooks, just pull to get the wrinkles out. Next is to install the fuzzy seal. It wont push on. You have to get it started and then tap down with a rubber mallet. Once installed the headliner gets even tighter. Trim the excess with snips and crimp the ends tucking any fuzzy back in at the ends. Trim with a razor knife excess headliner (about 1-2" all around) leaving enough at the front edge to cover the paint between the seals. Install the front and rear draft excluders using contact cement. The side seals butt up to the front seal and end at the end of the channel. I wasted a lot of time by not allowing the contact adhesive to flash off enough and thinking I needed to be stretching wrinkles out. I also wasted a lot of time trying to press the fuzzy seal on (wont happen). You have to tap it on with a mallet. The windscreen and backlight frames were stripped and painted. Both needed new trim. The plastic leather covering for the windscreen is formed well but needs to be contact glued to hold. Before gluing on find the holes for the mirror and sun visors and poke through with an awl. When gluing on the pieces poke a nail through the material into the screw holes as you adhere the pieces. (Thank me later) The chrome capping was shaped well enough and the rivet holes lined up near perfectly. I ran a 1/8" drill through each after affixing the center rivet. All the holes were within a couple thousands of dead on. I used seam sealer on the front edge along the rivet line. The capping will shape as you get all the rivets in. The hole for the snap isn't drilled maybe because they varied in location. The backlight frame gets headliner material glued on. Its pretty straight forward. Establish and mark a centerline on both long pieces and find the center on the frame. Only apply contact cement to the part of the frame that is covered later by the fuzzy seal or the glass glazing rubber. Pull out wrinkles as you move out from center and press down the glued areas to smooth. I used new screw on snaps into the existing holes. |
Marcus
So much fun just had to do another Archives
January 2018
Categories |
 RSS Feed